Showing posts with label video game. Show all posts

Tuesday, November 22, 2011

Nyan Cat Scarf


Nyan Caaaat!

Made me a Nyan Cat Scarf the other day and I loooovveee it

The scarf is actually about 7' long. A little bit longer than I expected, I was just aimlessly crocheting across and just ended up keeping it a length that I thought was fine that I had judged while sitting... I probably shouldn't have done that, but oh well 

I also probably should've started with shaping the head,  the face, then the poptart piece first. Since I did the actual scarf first, it made it more tricky to shape the cat the way I wanted it to.


So I have this hat, that comes with "arms" which have pockets to put your hands in. I plan on making a similar one, so that's why I'm not posting a reference photo for this. Just trust me when I say it comes with arms and pockets haha. Anyway, since it comes with a pocket, I wanted to transfer that idea to this scarf (I love pockets. I don't like carrying my purse all the time since I don't really have anything but keys, phone, and ID basically). Soooooo here's the pocket part


Yes, what you see there is Darth Vader in, what looks like, Nyan Cat's butt...

Wednesday, November 16, 2011

Companion Cube

So I got really bored one night and randomly decided to make a companion cube. My boyfriend loves portal and I wanted to make him something (since most of all the other projects I've made were mostly just for me and my own fun). So companion cube away we gooooooo.

This project also took me a little bit of time, seeing as how I didn't really have a pattern to work off of. There were 6 panels, 6 circles to go on each panel, 8 corner pieces, and 12 center pieces. And by "center pieces" i  mean the little piece that goes in between each corner pieces. Aka there are 12 edges of a cube, and there had to be 12 thingies strapped to each edge. Anyway....

The panel was a little tricky and had to be redone several times. The first attempt was done in rows and in the shape of a square. But when I placed the circle piece on top, it just didn't look as nice and neat as I had wanted. One piece was round and the other piece was in rows and it didn't look very nice. Sooooo how can I blend the two together? Work in the round to make a square? Work in rows to make a circle? I tried the former figuring it would look too warped if I did the latter. So how do I turn it into a square from working in the round...

Luckily me, I had recently learned how to do a triple crochet. Yarn over twice, hook through loop, pull through first two loops, yarn over hook through next two, yarn over, hook through remaining hooks... At least that is what I had remembered. So if it was wrong, oopsie because that's what I did to make this anyway. Too late for corrections at this point. So I figure for each corner, I would make a tc (the rounds were done sc in each stitch while also increasing to a certain point), in between each sc. But that made the corner look too odd and not quite a square. This time I didn't have to redo the whole thing, just figuring out a corner. Long story short, I eventually figured out the right combinations of sc's and tc's along with the right number of sts in each round to make a nice corner. 

Another tricky part was also making each corner pieces. This didn't take as long as the panels though, the best way to cover 3 edges: a triangle! I used that as the basis of my pattern to make the corner pieces.

Eventually all pieces were made and sewn together and bam! A companion cube is made.

I purposefully did this without a pattern because I am in the process of learning how to make my own creations. I just want pieces that I make to be of my own original work and from a pattern that I've created myself. This is to not to say I won't occasionally look up a pattern or a how-to to help me along the way, but it's purely a guide for me to use. 

But with that being said, I think the amount of crochet'ed pieces I will be posting in the future may come a little bit less as it will take me longer to try to figure it out and get used to being able to see what it is I want to make and break it down to different geometric pieces. I'll still post as often as I can, I still sew, knit, etc, so there may be a couple of those as well. 

So for now, here is my latest creation, the companion cube :)


What better way to represent a companion cube, than with han solo and his buddy chewbacca
...
Hm... by "companion" did they mean friend or life long partner? Should it have been Han and Leia???

Gotta Catch 'Em All! Pokemon!


Here is a little something a buddy of mine had linked me. I've seen a couple of pokemon amigurumi things before, but these were just absolutely adorable. This is definitely going on my list of things to make.


Tuesday, November 1, 2011

My Bile Jar

My first ever first person shooter (along with crafts I also enjoy video games :D ) was L4D2. What happened was that in this one group of friends that I have, the guys were always playing it (among other games) and I would just watch or sit around and basically NOT playing the games they were playing. Then finally one day last December, one of my friends got fed up that I don't have the game and got it for me. Which was totally awesome. I started up the game and I was instantly hooked. I had played video games my entire life, but only sparingly. Growing up, I wasn't allowed to have too many video games and toys. I was a "run around outside" little girl. To give you a glimpse, my first console was the N64 which was purchased as a gift from my parents (to the family, siblings and all) about a year and a half to two years after it was already released. But I was happy and content. Got the usual games, Mario Kart, Pokemon Something-or-other (I forget the name), and only one or two others. Played the hell out of them all. Then I got a PS2, which was purchased in about the same manner: a few years after its released. But that's fine by me. And well that's the idea of how video games were treated in my household. Then one fine day, after having moved out, I purchased and built my very first computer which I am quite proud of. And well L4D2 was purchased for me and I played it like crazy. I probably shouldn't mentioned this, but I think I played about 120+ hours in my first week alone! I didn't play the first game until a few months after, and I love them both.

Anyway, my favorite character is Ellis from L4D2.


His face model is Jesy McKinney, who is seen here dressed as Ellis


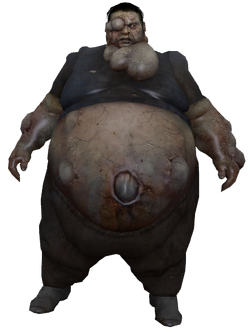
Anyway, in this game, there is what you call a "Bile Bomb." A jar containing "excrement" from a zombie called a Boomer.
Here is the Boomer...

And here is the jar containing Boomer bile...

So for Halloween this year, I decided to go as Ellis and with that, I just had to make this Bile jar. I looked around Google to find out how to make this jar, and I wish I had saved the link so I could link it, but sadly I didn't. Basically what I did was take a jar (I used an empty sriracha jar), a yellow highlighter, and a LED ice cube.

Breaking the highlighter and taking the ink/filter part is basically it. This was also probably THE ABSOLUTE difficult part of this "project." I just grabbed a knife and started prying the back end out. I would not suggest any of you doing it this way. I am quite certain there are much better and more safer ways of doing this. "Thinking" just wasn't with me that day... So pulling the cartridge out, stick it in the jar you are going to use for the bile. WEAR GLOVES! I will tell you why in a little bit. Putting the cartridge under a slowly dripping faucet, the water will work its way through the highlighter extracting the ink and into the jar. One highlighter should be enough for one jar, but it all depends on you. I filled the rest of the jar with water and dropped in the LED ice cube. If you purchase a cube that only has one color, get green, or if the cube has multiple color options, choose green.

Here are the LED ice cubes

This is what the inside of the highlighter will generally look like

What my jars looked like in the dark
These are actually the same jar. I just put the photos side-by-side.
You can print out the bile jar label if you want to Google for it. My writing on the left is also part of the printout, but I couldn't make it fit so I just wrote it in myself. The "421" is also my Star Wars reference.
"TK421, why aren't you at your post?"

 So that is what I made as part of my Halloween costume this year. Don't forget to wear gloves when doing this too. Why? Well even after I washed off the fluid from my hands, I did not realize till later that I did not clean them off enough. What happened? I had gone to a party where they used a black-light and my hands were all splotchy due to the highlighter fluid. Whoops!

Saturday, October 22, 2011

Bomberman

I wasn't able to sleep tonight, so this is the product of my inability to sleep.

Story Time!
A friend of mine, Veena,  recently got a new job at Game Over. In gist, it's a video game store that mostly sells retro games. It is a new love of mine. Anyway, while on this trip visit to Veena, she suggested I made a Bomberman Hat. Now, I don't think this is the type of hat she had in mine, but this is what I have so far.


This was made with a N hook, worked in round and blah blah. Made a little ball out of red yarn, then back to white yarn, I made a "stem" to connect the red bulb to the hat.

In retrospect I think the N hook came out to be way too large, so either I'll find someone with a large head to wear this, or I'll eventually take it apart and redo it with possibly a J hook. At least I will if I continue to make a hat double crocheting (dc) the whole thing. I've made a hat/mask similar to this one using a N hook but instead of dc i just single crocheted (sc) the entire thing and it fit a bit better. Hats are probably a little more tricky for me to do only because I feel like I have a smaller head than average and I only have me to test it on most of the time. Trial and error is the way to go for me. So if any one has suggestions as to how I can fix this, it'd be great. I'm open to any suggestions to fix, or even suggestions for additions to the hat.


Wednesday, September 21, 2011

The Pac Man Family and Ghost Friends

Here we've got Pac Man and Family
Pac Man


 Ms. Pac Man


Pac Man Jr.  


Ghosts of Pac Man
Inky


Pinky 


Blinky


Clyde


Finally finished the complete set! 

Does anyone know how to attach the inside of the mouth to Pac Man in a better/cleaner way? Any tips would help. Thaaaankk yoooouuu!


Wicket took them all!

Monday, September 19, 2011

Pac Man


My first pacman. I was so nervous about doing amigurumi/stuffed animal type stuff so this one turned out quite well I think. This one, I kind of made up as I went and it wasn't until I was half way done that I had the most clever thought! Maybe I should look up a pattern. And lo and behold, I wasn't too far off. Yay me!

So there is my pug Gus mimicking pacman it looks like. Oh and the one in the back is my Wicket!

So fair warning, there may also be lots of picutres of my dogs along the way =D