I made the yip yip practically free-hand, winged it, without a pattern. The eyes I had help from a friend who knew the straw trick.
enjoy!
This one is different from the other yip yip I made. If you don't remember, the other one was blue and this one is also bigger.
Yip Yip Pattern
Materials
Any size hook and any size yarn (~3 colors: 1 for body, 2 for eyes (iris/pupil and white of eyes)
1 straw
Abbreviations
Ch: chain
Sl st: slip stitch
Sc: single crochet
St(s): stitch(es)
Body
ch 15 then join to beginning to chain with sl st
Round 1-5: sc evenly around 4x (or until the diameter of circle is about equal to the height)
Now you will be going back and forth making rows along one half of the circle. Rows will slowly decrease
Row 6: sc 7 sts
Row 7: turn, sc from 2nd ch from hook (do not turn, ch1. Just turn). Sc evenly to end (1st st in Row 5)
Row 8-10: turn, sc from 2nd ch from hook. Sc evenly to end.
The edges of Row 6-10 will be sewn together, folding inwards towards center of circle rounds. But don’t sew them yet!
Eyes Make 2
Take the straw and cut off a length of about ¼” but any size you’re comfortable with is fine as well.
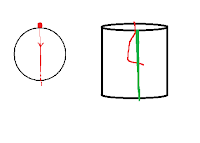
 - After covering straw, make sure to take the yarn and make it go across the top of the straw (the tail is sticking out the bottom of straw), then loop underneath opposite yarn on outside, close to bottom if possible, and tie off. (red: end of yarn; green: yarn already wrapped around straw. Red goes under green)
-Now swap to the iris/pupil color, and thread from bottom of straw to top of straw, and thread around the yarn that went across straw in previous step. Repeat until desired iris size and reached.
-(Assembly) Take each eye and place somewhere in Row 6-10, where when sides are sewn together, the eye placement is where you want it. Thread tail end of eye down through the “head” of the body and tie off. Sew sides of head together.
Tail end
This part is pretty much a bunch of fringe ends.
-Cut off several quite lengthy pieces of yarn, I believe I used about 10” or so.
-Grab center of single yarn length, pull through 1 st at bottom of circle round. There should now be a loop, now pull the two tail ends through the loop.
-Take each loop and crochet to end, tie off.
-Repeat until entire circle round is full of fringes.

No comments:
Post a Comment